


I have been wanting to create a layered 3D mandala project for a while, but since I am a Disney fan I knew I wanted it to have a Disney element to it. There are a lot of beautiful circular layered 3D mandala svg files available for free or for purchase, and since Mickey Mouse is basically made of three circles, that is what allowed me to create my design.
By the way, this post contains Affiliate Links to companies I have partnered with, such as Amazon. As an Amazon Associate I earn from qualifying purchases. You can think of affiliate links like tipping your waitress, only it does not cost you anything extra! Thank you for shopping with my links!
Layered 3D Mandala Project Supplies
- Shadow Box/Display Box Frame
- Foam Tape
- Colored Cardstock
- You will need one color for each layer in the mandala svg. The cardstock sold at MyCraftSource.com is very high quality and I recommend it. Make sure to use coupon code ShawnMosch at check out to save 5% off your order!
- I also used a woodgrain cardstock to put behind the design inside the frame
- High quality layered 3D mandala svg file
- I talk about SVG files more below, but if you want to jump right to my list of places to find SVG files you can click HERE.
- The SVG file that was used for this project was shared in a private group I am in, but I found a very similar one that can be purchased on Etsy – Click HERE
SVG Files and Images – Knowing the Difference
First, I would like to talk about how important it is to use a good quality svg file for your projects. I know that a lot of Cricut owners do not understand the difference between a true svg file and an image, and a lot of this comes from the misuse of the terms in social media.
This is why I put together The Ultimate SVG Guide, which will clearly explain to you what a svg is, how to download it from a website that offers svg files, and then how to upload that svg file to Design Space. Some of the basic ways to know if you are using an image or a svg file would be if when you upload the file to Cricut Design Space and you need to remove the background, that is an image and not a svg. This process is commonly called cleaning up an image.
If Cricut Design Space gives you the option to save it as a Print then Cut project, that is an image and not a svg file. If the design has multiple colors in it, and when you upload it to Design Space it comes in all black, that is an image and not a svg file. Finally, if someone shared the design with you on a social media group, it is an image and not svg file.
Additionally, there is no way to make a svg file in Design Space. This is because a svg contains data. You can upload an image to Design Space and save it as a Cricut cut file, but that is still not the same as making a svg. You would need to use a different software to create svg files, or an online converting application to do that.
So first things first . . . go and find a layered 3D mandala svg file that you want to use for your project. I have a list of over 20 places you can start looking HERE. Picking out a mandala svg design is a very personal choice. You have to love the pattern in the design if you are going to love the finished project. After a lot of research, I did find a layered 3D mandala SVG for sale on Etsy that is very close to the one I used, and you can purchase that HERE.
Upload Mandala SVG to Cricut Design Space
For this tutorial I am going to show the process on the computer version of Design Space, but if you are uploading a svg file using the mobile app, I do have a video for that process HERE.
After you pick out the layered 3D mandala svg that you want to use, you will need to upload that file to Cricut Design Space. Click on the Upload button shown on the left hand side of the screen in the image below.

In the next screen you will click the Upload Image button. If you read through the information just above this button it will tell you the different file format types that you can upload. The png and jpg file types are the ones that images typically are. These are the ones you will have to clean up and save as a cut file. You can see that another one of the file types listed is svg, and that is what we will be using for this project.

The next screen you will see will ask you to either drag and drop the svg file into the screen, or you can click the browse button to navigate to where you have the mandala svg file saved on your computer and select the true svg file. Just a side note, a true svg file, like the mandala svg we are using, will never be the file that has the pretty picture preview. Typically the icon will look like that of a web browser like the Microsoft Edge icon. I go into this in much more detail HERE.

The next screen you will see will look like the one in the image below. Notice that there is only one option available to you, and that is to save this as a cut file. This is because I am using a true svg file for this project. Cricut Design Space does not even give me an option to save this as a print then cut project, since it is a true svg file.
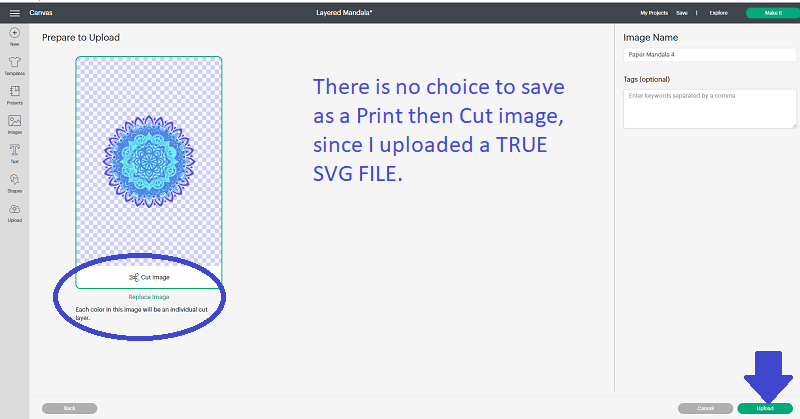
If I had used an image, which is typically a jpg or png file, then I would have to make a choice as to whether or not I wanted to save this as a cut file or a print then cut file at this point.
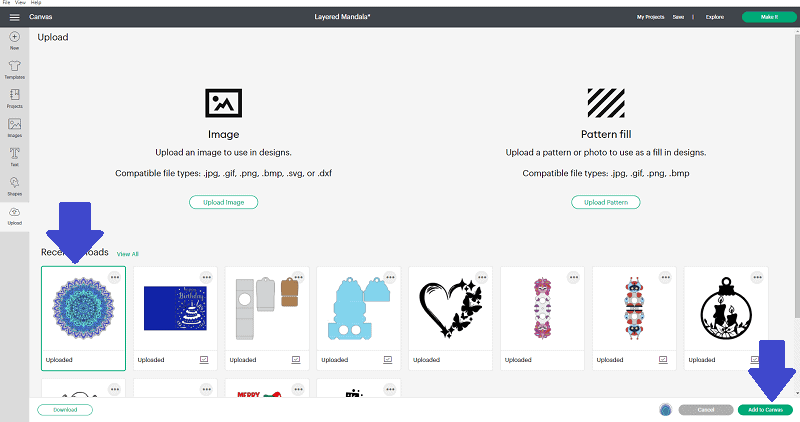
After clicking Upload, as shown in the image above with the blue arrow, I will next see the screen in the image below. You can see that the layered 3D mandala is in the very first spot in my Recent Uploads section. Now I can click on that, and then click the Add to Canvas button in the lower right corner of the screen.
That is it! This is why using a true svg file is so much better than using images that you have to clean up. The image below shows you that the entire mandala comes in together, and if we look at the Layers Panel on the right hand side of the screen, we can see that it brought in all seven layers at one time. Each color is on it’s own layer. I did not have to do anything to create those layers, add color to those layers, or separate those colors . . . the svg file did that for me!
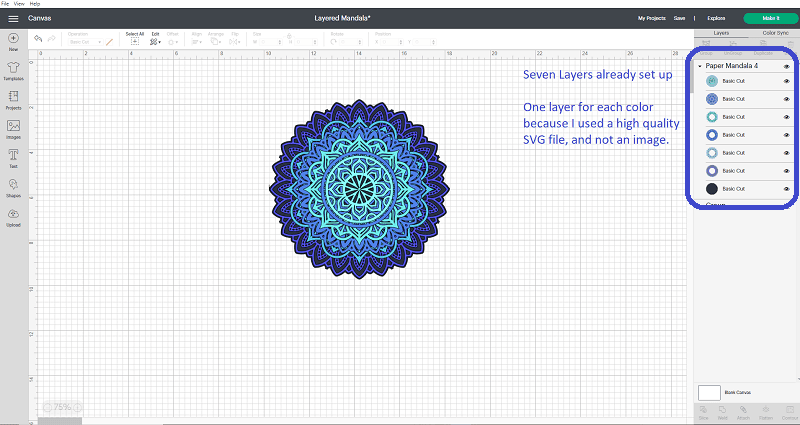
This is all because svg files contain data in them. That data tells the Cricut, and other die cutting machines, information such as layers and colors. That is the beauty of using a true svg file. If you only take away one thing from reading this article, I hope it is the knowledge that images (png or jpg files) and svg files are NOT the same thing.
Creating a Mickey Mouse Frame
Now, if I wanted to I could have just hit Make It at this point, and cut all seven of the colors of the layered 3D mandala, stacked those layers and put them in a frame and been done with this project. If this is your first time visiting my site, you might be thinking “that sounds great!”. But if you have been following me for a while then you know I love Disney, and if I am making something THIS detailed there is no way I am not adding some Disney magic to it!
I knew I wanted a Mickey Mouse framed outline to this whole project, so that the head of Mickey was very clearly defined and not just implied by the outline of the mandala SVG. To start I am going to click on the Images button on the left hand side of the screen in Cricut Design Space. I have that button indicated with the blue arrow in the image below.
Then, to find the Mickey icon that I used for this project, I typed Mickey into the Image search bar. Once I selected the image I wanted to use I just click the Add to Canvas button.
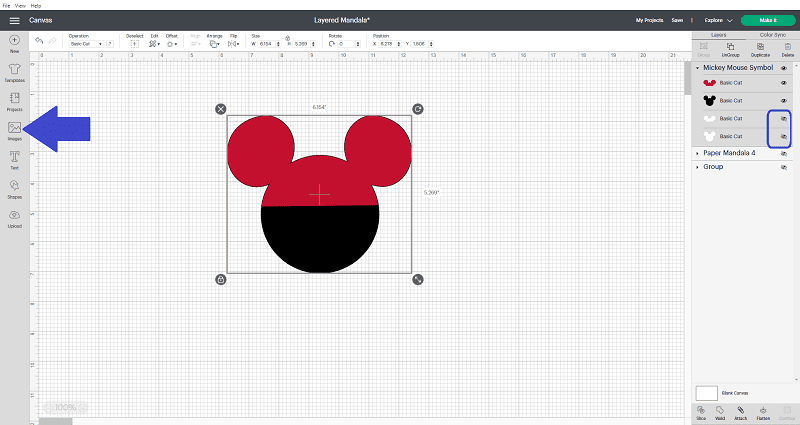
If you look on the right hand side of the image above, you will see the Layers panel. You can see that this image has four layers. From the top to the bottom, they are
- a red top half of Mickey Mouse’s head
- a black full Mickey Mouse head
- a white shadow layer of the top half of Mickey Mouse’s head
- a white shadow layer of the full Mickey Mouse head
If you look at the small eyeball icon to the right of each one of these layers, you will see that the two white layers have a line through them. I have these indicated with a blue rectangle in the image above. The line through the eyeball icon indicates that the layer is currently turned off. If you click on those eyeball icons you can turn those layers on.
For my layered 3D mandala project I know that I will not need the two layers for just the top half of Mickey Mouse’s head, so I am going to delete those. Since this image is currently has all of the layers grouped together, I am going to select just one layer at a time from the layers panel. This is a great trick so that you can select just one layer without having to ungroup all of the layers!
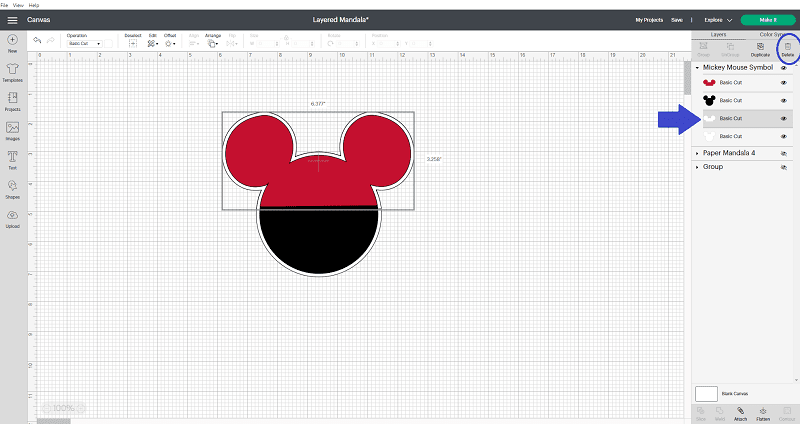
When I select the layer from the layers panel directly, I can then go up to the Delete button in the upper right corner of Design Space, and delete just that one layer. I have the Delete button circled in the image above to help you find it. Use this trick of selecting right from the layers panel to delete both the red half of a Mickey head and the white half of a Mickey head.
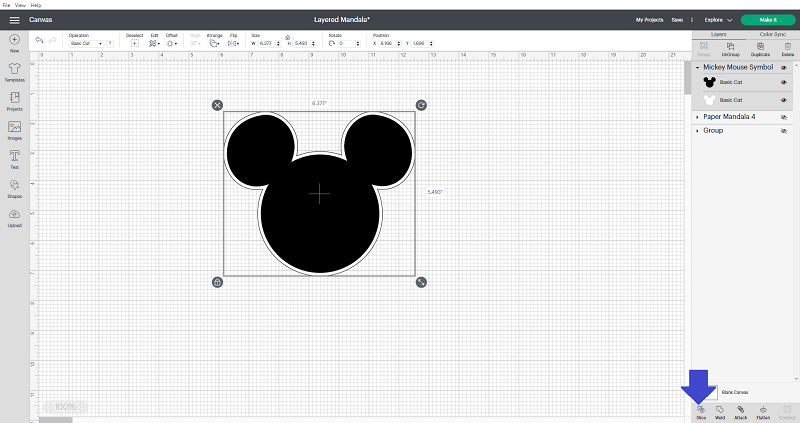
That will leave you with the two layers that you see in the image below, the full black Mickey Mouse head and the white shadow layer of that same image. If you select both of these layers at the same time, you can then click the Slice button in lower right corner of the Design Space screen. Slice will cut one item from another item, so in this case it will cut the black Mickey from the larger white Mickey.
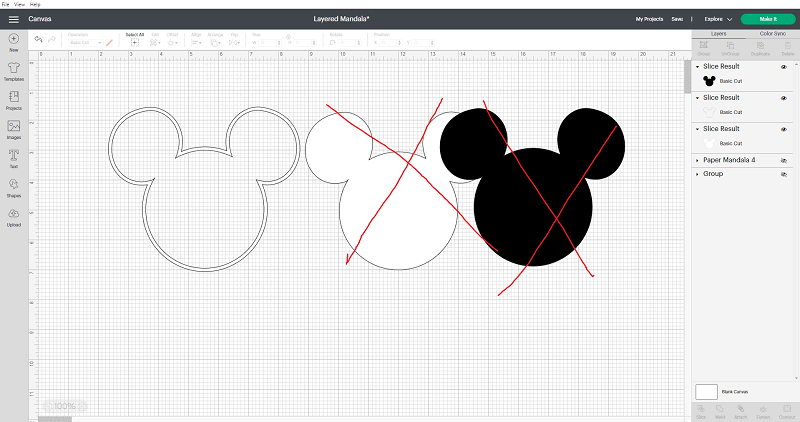
After you have sliced, you will notice you have a lot of extra pieces. If you want to see all those pieces you can do what I did in the image below and click on a piece and pull it off the right side. Those full Mickey Mouse heads are no longer needed for this project so you can just delete them. All we really need to keep is the frame shape on the left.
Before we go any further, I want to make the Mickey Mouse frame as large as I can so that it will really fill up my sheet of cardstock. A standard sheet of cardstock is 12 inches by 12 inches. This is also the size of the standard Cricut cutting mat. One thing to remember is that Cricut Design Space will take off 1/4″ around all sides of the cutting space on the cutting mat. They do this to help ensure that you never get a cut that goes off of your material you are cutting from.
This would mean that the largest I can cut this Mickey Mouse frame is 11 1/2 inches by 11 1/2 inches. I am going to click on the Mickey Mouse frame on the top panel in the middle of the screen there is a section that says Size. I am going to type 11.5 into the width area and then hit Enter on my keypad. There is no need to enter anything for the height. Cricut Design Space will figure out how tall to make the image in order to keep Mickey’s head proportional.
Looking at all those Layers
It was at this point in the project that I starting to think about the number of colors in this layered 3D mandala design. There are seven different colors, each on their own layer. I want to copy those same seven colors into the head and both the ears of Mickey Mouse. I am worried that if I leave the colors as they are when I imported the mandala svg, it could become difficult to keep the layers sorted in the right order. I decided to make them bright rainbow colors to help me keep the layers in order.
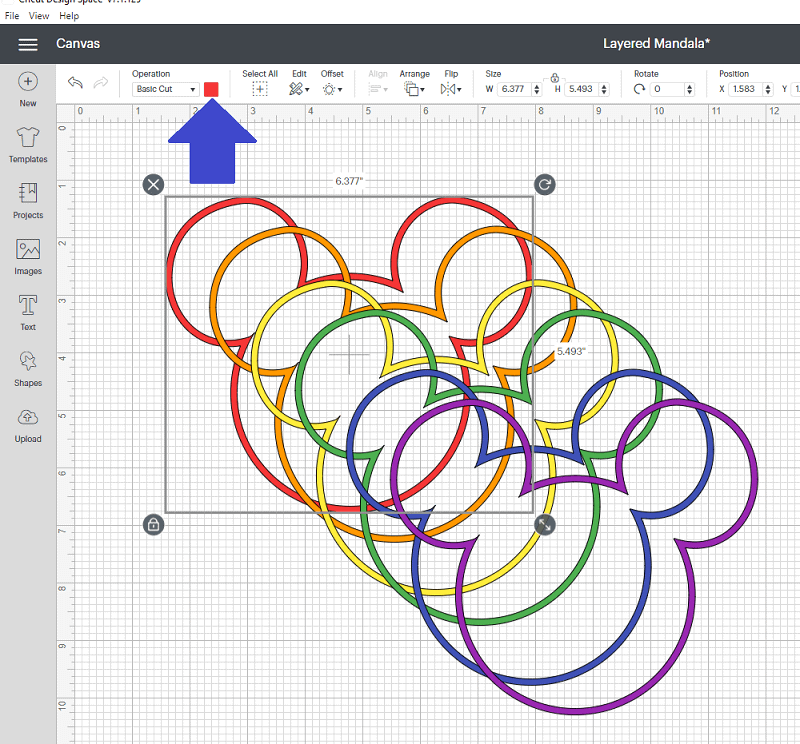
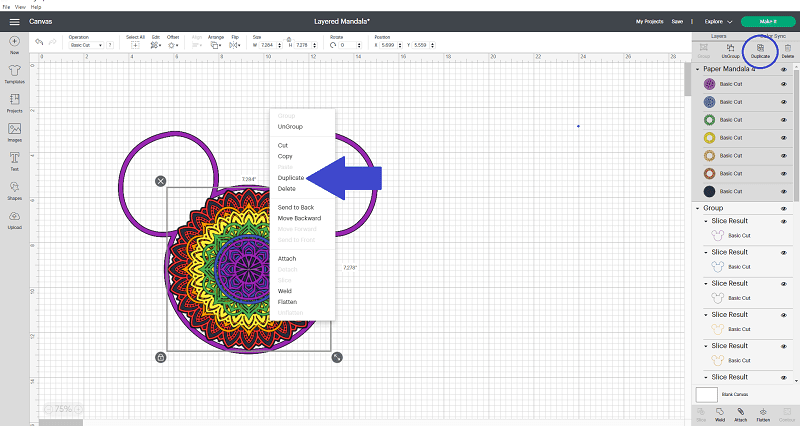
I was also going to need a Mickey Mouse frame piece for each layer, so I started with that shape. I knew I would need six copies of that shape, since I have seven layers in my mandala design and the back one will not need a frame since it is a solid piece. To make these copies I am going to use the Duplicate function.
There are two ways to Duplicate something. The first way to use Duplicate is to right click on the image, and then you get a pull down of options, like you see in the image below by the blue arrow. Then you just select Duplicate from that pull down. The other way is to click on the image, and then you can click on the Duplicate button in the upper right corner of Design Space, which I have circled in the image below.
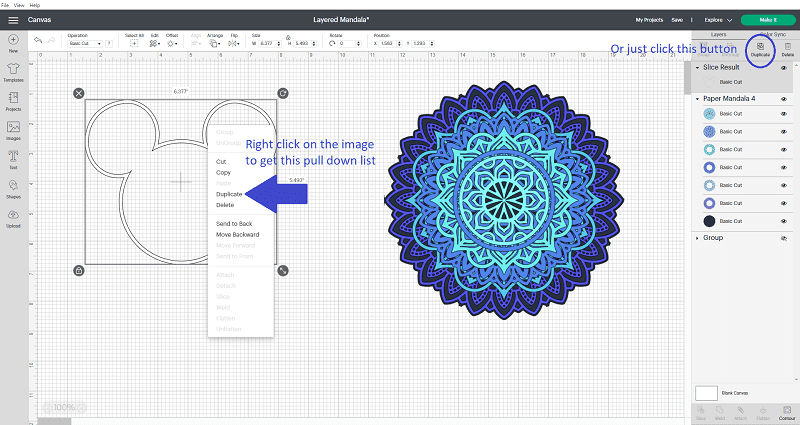
Duplicate is like using the Copy and Paste function, but it does it all in one step.
Just keep repeating that process until you have a total of six Mickey Mouse frames. Next I will click on each one of the frames and make it a different bright rainbow color. To change the color just click on the box in the Operation section, located on the top panel of Cricut Design Space. I have it indicated with a blue arrow in the image below.
Using Color Sync in Cricut Design Space
Once you have all of the frames set to a different color, I want to show you a little trick you might not know about in Cricut Design Space. Look over on the right hand side of the screen, right next to the word Layers. Do you see the tab called Color Sync? Click on that. Now your screen should look like the image below.
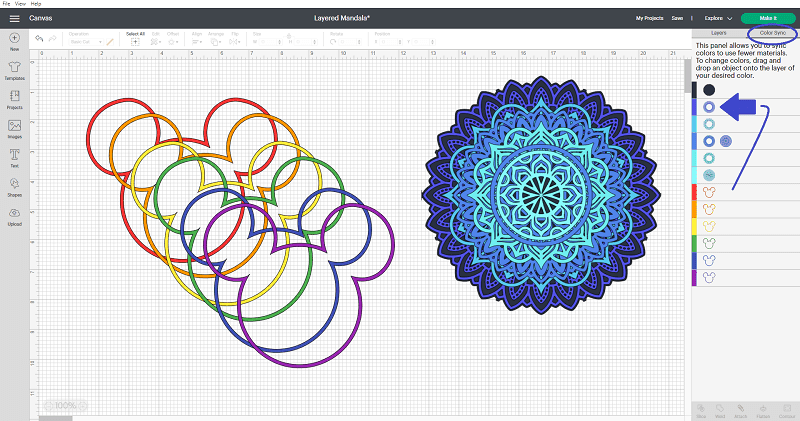
Color Sync shows you all of the colors that you have in the designs on your Cricut canvas, and allows you to quickly and easily slide items from one color to another color. This is REALLY hard to explain, so I did go over it in the video I made to go along with this project. Basically I clicked on the first layer of the 3D mandala and dragged that shape down to the red Mickey frame layer and software set them to be the same color.

Then I just clicked on the next mandala layer down and dragged that down to the orange layer. Keep going in this manner until all of your pieces of the layered 3D mandala are assigned to the six colors of the Mickey frames.
Color Sync comes in really handy when you used more advanced or very specific colors in your project, or if your project is made up of all shades of one color. I recommend you try it out and play around with it. You never know when you might need it!
Using Align in Cricut Design Space
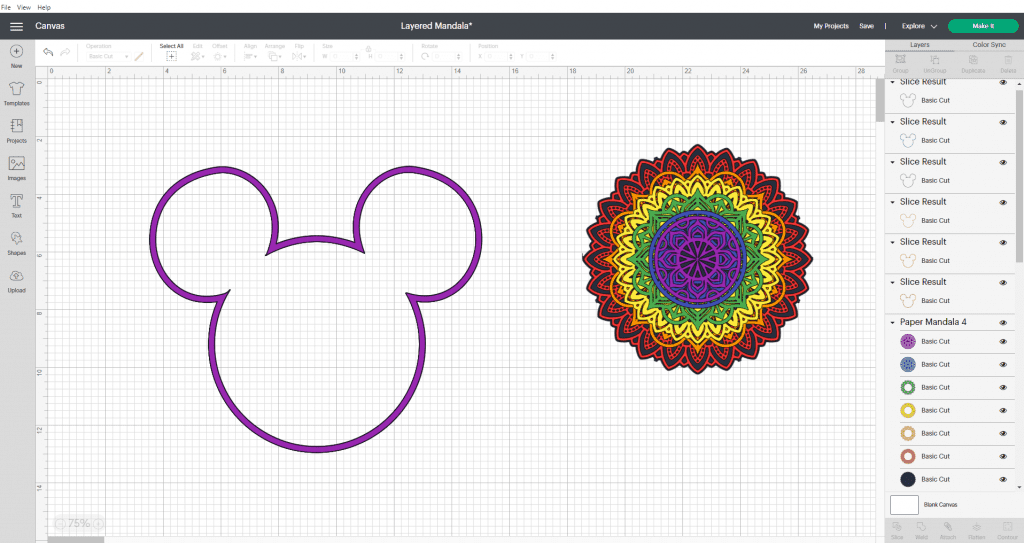
Now that I have all of those brightly colored Mickey Mouse frames, I want to stack them perfectly on top of each other. There is a quick and easy way to do this in Design Space. I select all of them by making a big window/selection square around them and then on the top of the screen I go to the Align function. From the Align drop down I am going to choose the option called Center. I have it indicated with the blue arrow in the image below.

This will tell Cricut Design Space to perfectly center all of those Mickey Mouse frames on top of each other. You can see that it did that when you look at the image below. Now all that you see is the purple frame since all of the other colors are stacked underneath that one.
Next we will move into filling in all of the open space inside the frame for this Mickey Mouse layered 3D mandala.
Creating the Mickey Mouse Mandala
I really feel like the rest of this project is going to be easier to understand by watching the video, but I am going to do a small portion of it here in screen shots also. First I move the mandala piece inside the main head portion of the Mickey Mouse frame. Then I am going to resize it so that the tips of the red layer of the mandala just touch the frame.
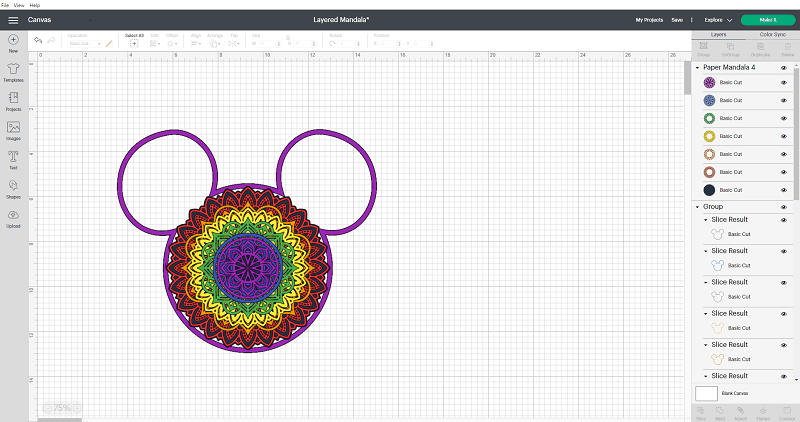
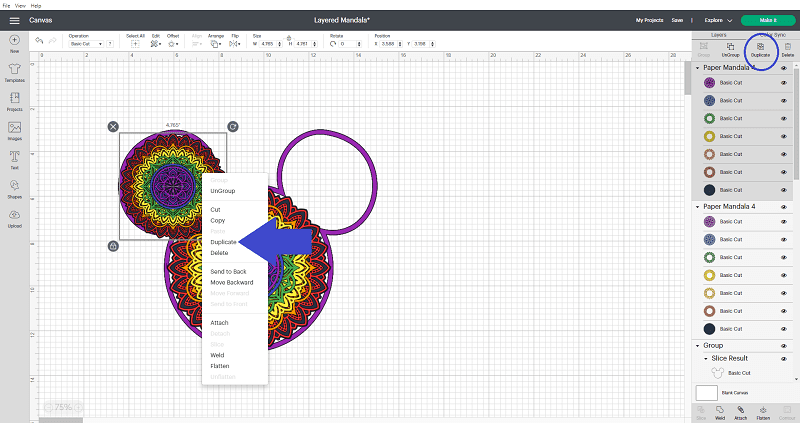
Since Mickey Mouse is basically made up of three circles, I will just use this same mandala image three times to build Mickey! Here is another benefit of using a mandala svg file, I can click on the one image and use the Duplicate button to quickly and easily make a second copy of this entire layered 3D mandala design, just like I did with the Mickey Mouse frames earlier in this project.
Another benefit of using a mandala svg file is that I can then resize the entire mandala at one time, since the different layers are grouped together. In this case, I am going to resize the second mandala to be the size of Mickey’s ear. Once I have that second mandala the right size for the ear, I can duplicate that for the second earl
Ungroup in Cricut Design Space
In Cricut Design Space, the Group feature allows us to more easily work with our layers within a design. When you group things in Design Space, each layer will still retain the color and relative position within the grouping. For example, when all of the parts of this layered 3D mandala are grouped together we can resize the entire mandala at once, instead of having to resize each color or layer one at a time.
Ungrouping things is basically the opposite of group. When you are ungrouping things you are telling Cricut Design Space that you want to be able to work with each layer independent of the other layers. Because of this, you would want to make sure that everything is ungrouped before you try to do functions like Slice or Weld. If you were to weld while things were already grouped, you would end up welding everything together, and not just the layers you wanted to weld together.
To ungroup, select everything and then click on the UnGroup button in the upper right side of the screen. I have it indicated with the blue circle in the image below.
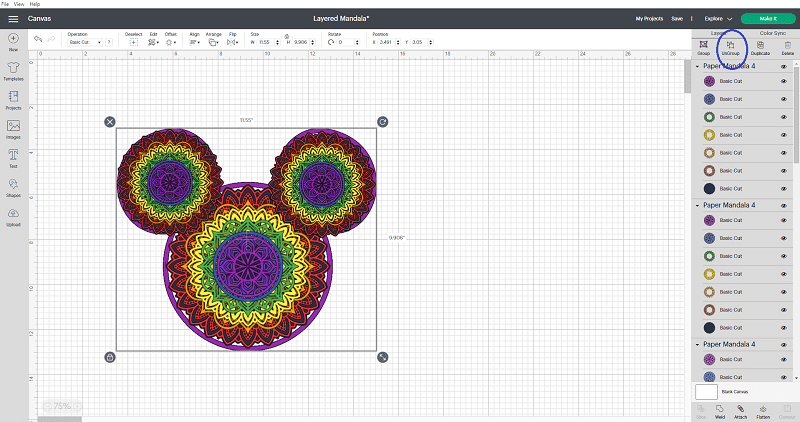
Now, another thing to note is that Cricut Design Space will only ungroup one grouping at a time. For example, There are three groupings, one for each mandala, in my layered 3D mandala design. I could click on each one and ungroup it, but I was worried that I might accidentally shift the way I had things position and arranged, so that is why I just selected everything at once.
So if I again select everything, and look at the UnGroup button a second time, if the UnGroup button is still dark text, that means that something in my design is still grouped. If the whole UnGroup button was grayed out, that would mean that everything in the design was already ungrouped. So just keep repeating this process until you have everything ungrouped.
Matching Up the Layers
Now comes the part where you will really see why I wanted to make all of those layers different colors. I am going to want to look at each layer one at a time and look at which items touch the frame, or where some of those layers may even touch each other between the head and the ears.
Again, I think this is a topic that some people understand easier by seeing the process happen, so I did cover this in the video below, but here is a quick screen shot to try and walk you through the process before you see the video.
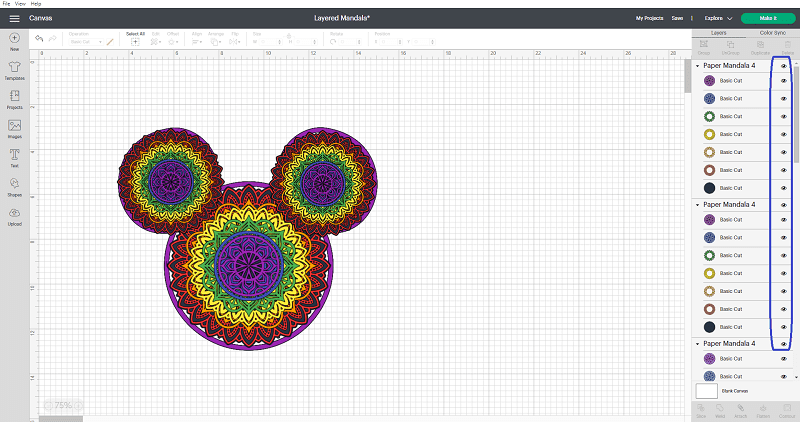
If you look on the far right in the Layers Panel you will see some eyeball icons. I have circled them in blue in the image above for you. These eyeball icons allow you to turn on and off layers in Cricut Design Space. This comes in really handy on a project like this layered 3D mandala, because now I can keep everything placed exactly where it is, turn off the colors that I do not want to see and really just focus on one layer at a time.
2023 Update for this project
Cricut Design Space went through some updates recently, and once of the changes that instead of only having a Weld button, there is now a Combine button. Combine has the Weld feature as one of the choices, but it also gives you other options.
Due to this update, the Weld feature was not working in the same way as it did when I originally created this layered 3D mandala of Mickey Mouse. I am happy to report that the weld feature is once again working the way it did in my original video BUT just in case it is not working for you, I wanted to keep the information about the work around in this tutorial.
I played around with SEVERAL ideas I had to try and make this project exactly like my original project. and I could not get the same results that I used to. I am guessing that it has something to do with the last Design Space update. I also tried a few other tricks I know . . . nothing worked!
I did try welding a mandala with a lot less detail in it to a frame piece, and that worked. Because of that I can only assume that the layered 3D mandala design I was using just had too many intricate pieces in it, and Design Space could not calculate what I wanted it to do.
I did record a new video to show that the Weld does not work like it used to for this project. I also show some of the other things I tried to fix the way the project came together. At the end of the video I suggested cutting the frames and the three circular mandalas without welding them and just glue them together after you cut them out. Then stack them in the shadow box.
So I would suggest that you test using the weld function and if it is working weird for you, use my alternative way of just stacking the circles instead of welding them to the frame piece. But if your weld IS working you can continue on with the tutorial as it was originally intended.
NOTE: Make sure that all items are UNGROUPED before starting this process.
Turn off all of the various layers except for the red ones. There will be a total of four red layers in this design. One red layer for the head of Mickey Mouse, two for the ears, and one for frame. Once you do that, your screen would look like the image I have below.
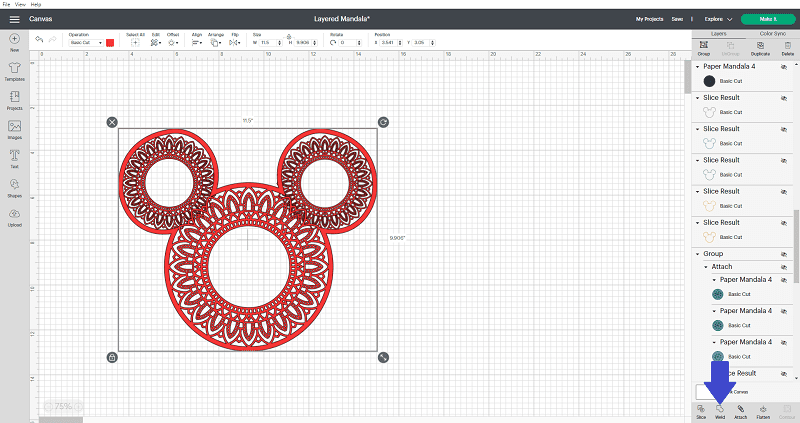
Now I can start to Weld the frame to the pieces of the layered 3D mandala design so that they will all cut out connected to each other. Weld is used to join anything that is touching into one thing. Now, since this design has so many tiny cuts within the design, and Cricut Design Space will fill in areas where one cut intersects something else, I am not going to weld the entire design at once, to try and help avoid having things fill in on me.
So for this design I selected the largest mandala and the frame first, and then clicked the Weld button in the lower right corner of the screen in the image above. Depending on the design you use, and the placement and position of things you might find you have to use Slice to remove some of the overlap of the design between the ears and the head mandala pieces.
Once you have the red layer welded together as you want you can turn off the red layer and then turn on all of the orange pieces of the layered 3D mandala to look at those, and if any of the pieces touch the outer frame you can weld those to the frame.
If none of the pieces touch the frame, but you want to make sure that they cut out exactly as you have them arranged, you could select all of the orange pieces and click Attach. Attach holds the placement and position of things from the Design canvas to the cutting mat. If you do not use Attach here, you might have to manually move around some of the pieces of the layered 3D mandala in the cutting mat preview screen, but I will show you how to do that in the video.
Continue doing this until you have worked through all of the various colors of the layered 3D mandala design. Once you are done, you can turn all of the colors on so that you can begin cutting.
Cutting the Layered 3D Mandala
When you click the Make It button the Cricut will automatically sort all of the different colored layers to show up on a different Cricut cutting mat. It will even show you which color it wants you to put on the cutting mat and load into the Cricut first.
Remember, I do not actually want to cut this design out of the bright rainbow colors, I am just using those to help me keep everything organized for the layered 3D mandala design. What I did was pick out the shades of blue and teal that I did want to use, and put them in a stack in the order I wanted them to be within the completed project. Then that same order matched up with the order the Cricut was telling me to load the paper in.
Assemble the Layered 3D Mandala
After all of the pieces of the layered 3D mandala were cut, it was time to put the whole project together. You will adhere the pieces together one layer at a time.
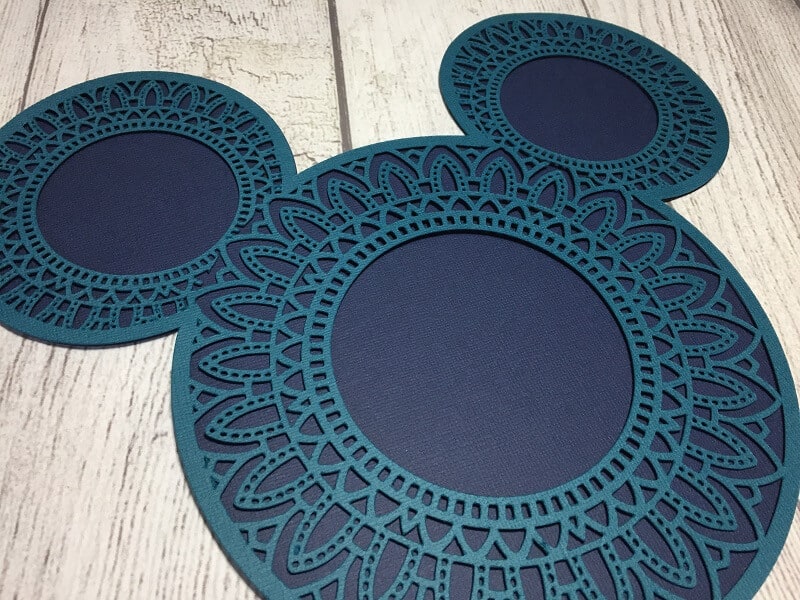
Take the first piece of the layered 3D mandala and flip it over. Along the back side of the piece add some double sided foam tape. This is what will give your project depth and make it look 3D. Some people like to just place the foam tape in a few key areas. I decided to basically line the entire outer edge of my first piece with the foam tape.
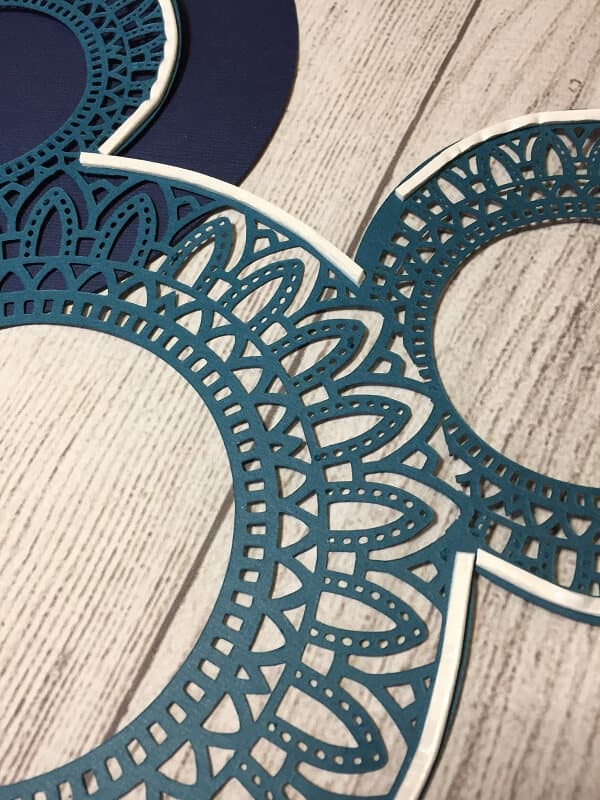
Continue on building up one layer at a time. Remember to add your frame pieces to the outer edge, otherwise the centers of the layered 3D mandala will be thicker than the outer edges.
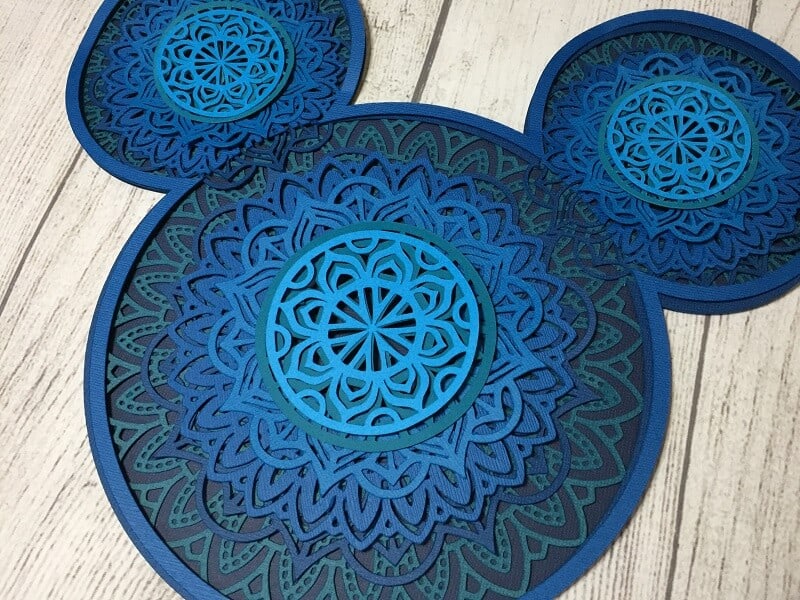
Speaking of those outer edges, I did not like how I could see the white side of the foam tape. I know I could have avoided this by making a thicker frame or using the foam tape in only a few places, but I had already gotten this far and needed a way to hide the white. I ended up doing a dry brush technique.
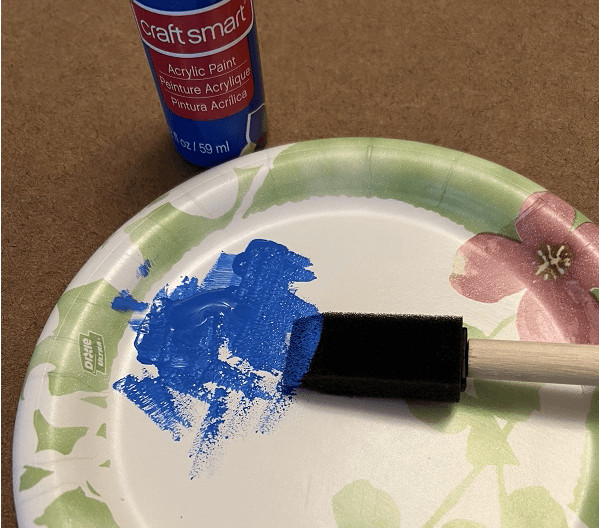
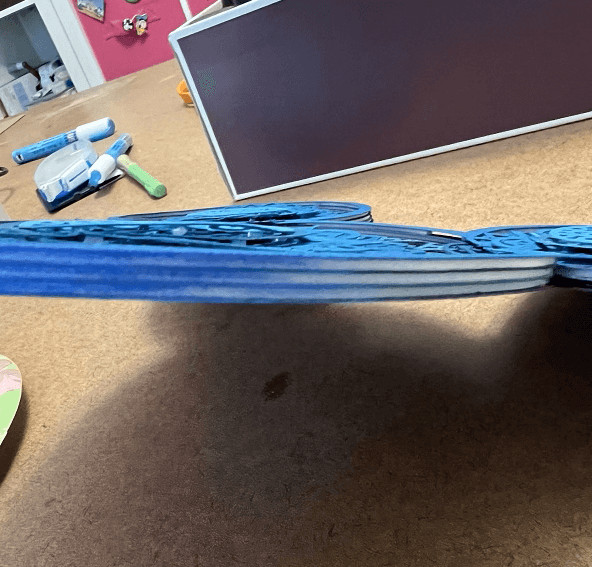
I placed a small amount of blue acrylic paint onto a paper plate, and then dabbed a foam brush into that paint. The idea is to have just a little bit of paint on the brush, so you can see I then dabbed the brush on the plate to get a lot of the paint off. Next I lightly brushed around the edge of the entire layered 3D mandala to tone down the white and make it less noticeable.
Once the paint dried, all that was left to do was to place the Mickey Mouse mandala in a frame and find a place in my house to display it.

Layered 3D Mandala Video
Because we all learn differently, I like to combine my written tutorials with short videos. This allows you to take the time to read through the steps, but also to watch me go through the steps and really see everything come together.
I hope you enjoyed my layered 3D mandala project, and that you learned how to use a true SVG file, like the mandala svg I used for this project!
The SVG I used was shared for free in an online crafting group, but I was able to find an almost identical SVG for sale on Etsy. Click HERE to purchase it.
Otherwise any circular layered 3D mandala SVG file will work. Below is a list of some options I have found for you.
- 3D Layered Mandala
- Multi Layered Mandala
- Layered Mandala
- Mandala Frame Bundle – if you use this one you could stack some of the different frames on top of each other to create your own unique design
- Seven Layered Mandala
- Set of Two Layered Mandalas



9 Responses
how do you get the paper to cut clean? when doing paper cards i always have pieces that dont cut through and it rips when i try to take them off? This is a gorgeous mandala thank you for sharing>
Use a good quality cardstock, make sure your mat is clean and for this project I used the cardstock + setting . . . it is a little deeper and has a little more pressure.
This is such a clever idea! You put in a ton of work and it really shows.
I love this! Great work!!
Do you have a set of instructions for someone that uses silhouette or no?
I do not, as I have never worked with the Silhouette software.
How do you get the last 2 layers with the double sided foam tape without it being seen? I’ve been staring at it for 1/2 hour trying to figure it out
I am not going to lie . . . it was hard! I used the skinniest foam tape that I could and only put it in small sections. Then in the spots where I felt like it was still showing a little I painted the sides of the foam tape that you could see with some blue paint, so then they blended in with the paper color.
This is beautiful! Oh how I wish this was for sale.